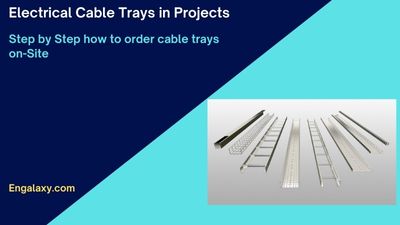
Hello everybody, and welcome to a new post in our engineering Blog “The Engineering Galaxy”
In this article, I will talk about how to order the perforated cable tray type, its fittings, and accessories.
But, before that, I would like to give you a brief about the different types of cable trays based on the design concept.
(i) Cable Trays Types:
A- Cable Ladder:
It has two main types based on the shape and manufacturing of its steps, Swaged rounded tubular (Aluminum or Steel) or welded c-channel (steel), as you can see in the next photo.
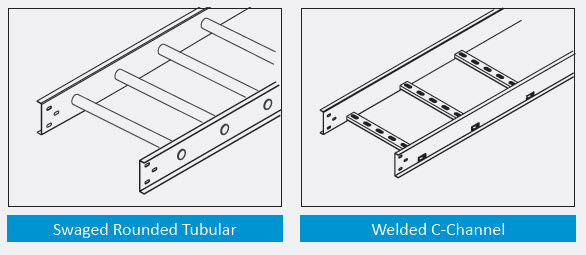
It’s a prefabricated metal structure consisting of two side rails connected by individual transverse embers or rungs.
Cable Ladder Trays are the most common and the most economical types of trays.
They also provide maximum ventilation for cabling.
Usually, we are using them with the medium voltage cables or main LV cables in the Transformer & Switchgear rooms.
B- Wire Mesh Cable Tray / Wire Basket Tray:
It is ideally suitable for light – to medium-duty commercial and industrial applications where space is at a premium. SFSP wire Basket Trays have a fast connection profile for installations requiring long runs of straight Cable Trays lengths.
Applications: Network cabling, wiring closets, fiber to-desktop applications and can often be used in suspended ceiling plenum areas and under computer room flooring.
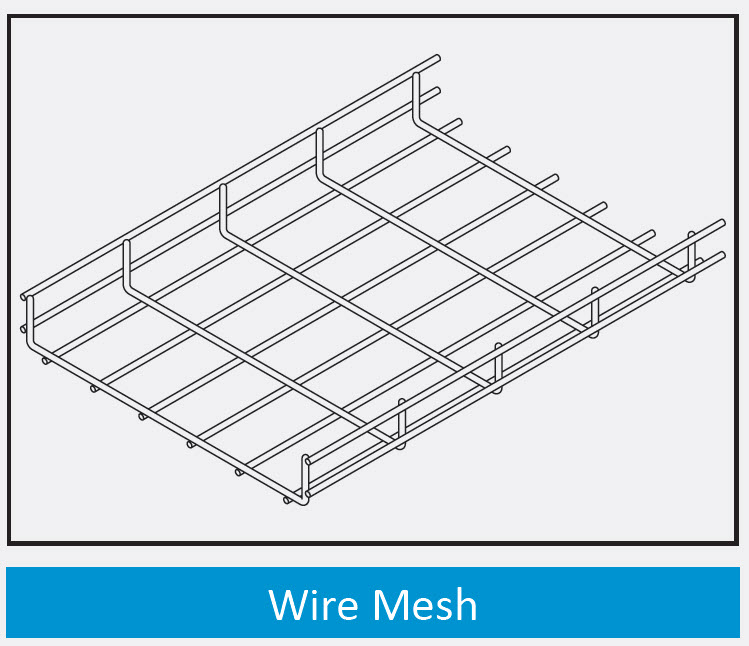
Usually we are using this type with the ICT/Low current systems and especially the structured cabling.
C- Solid Bottom Cable Tray ( Cable Trunk):
It’s a prefabricated metal structure consisting of a one-piece solid bottom channel section that usually not exceeding 6”(150mm) in width .
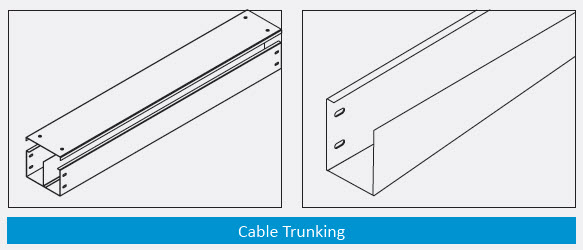
Usually we are using this type of trays with the final circuits like Lighting, Power,…etc.
D- Perforated Cable Tray:
If you would like to know about the different cable trays types, you can refer to the previous video.
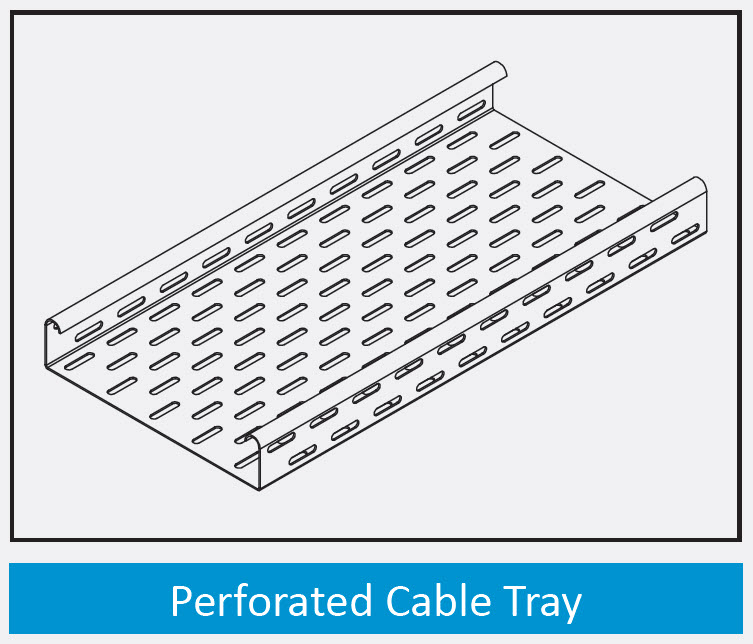
It’s a prefabricated metal structure consisting of a bottom with openings within the cable bearing surface.
Solid bottom Cable Trays completely eliminate cable sagging and offer maximum protection for the cables.
We are using the perforated cable trays type mainly with the low voltage power cables.
To order the straight length of the perforated cable trays, you need to know:
1- The length of a straight piece of the perforated cable tray (L):
Usually, it’s 3 meters. Based on your full path of the cable tray route in meter, you will decide how many pieces you order.
For Example: if the route length is 269 meters, in this case, you need 89 pieces + 1 more meter, so we will 90 pieces.
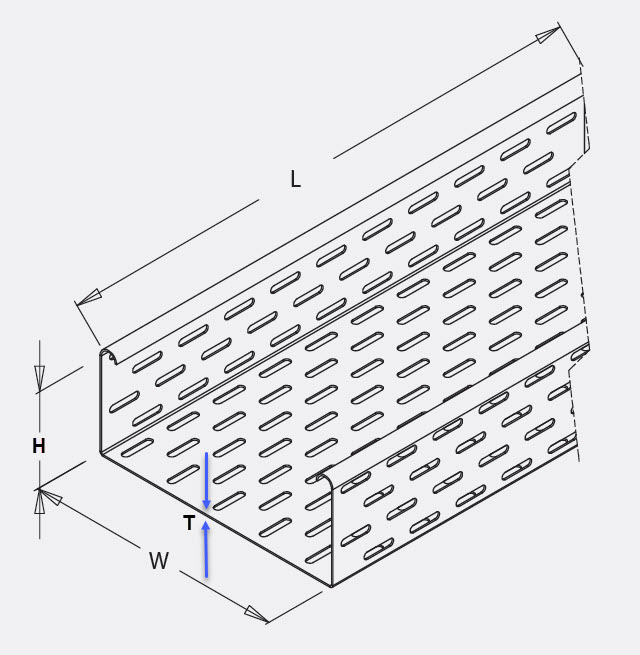
2- The tray’s width (W):
It depends on the approved shop drawing based on the sum of the cables’ overall diameters. Either they are existing or will be installed and taking into consideration the spaces between the cables.
3- The side height of the cable tray (H):
It depends on the maximum overall diameter of the cables in the tray. This to ensure the tray’s side height can contain all the cables when you install the tray’s cover.
4- The thickness of the cable tray (T):
This is depending on the overall weight of the cables that will be installed inside the cable tray.
5- The material & finish of the cable tray:
It depends on the cable tray’s installation environment and its application, whether we will install it indoor or outdoor, or in a dry area or a wet area.
We have different types & finishes of the cable tray like:
– Aluminum.
– Pre-Galvanized Steel
– Hot-Dipped Galvanized After Fabrication
– Stainless Steel
– Fiberglass
6- The type of the return flange of the cable tray:
We have different types like:
– Inside Type Return Flange, we will call it RFI
– Outside Type Return Flange, we will call it RFO.
– C Type inside, we will call it CTI.
– C Type Outside, we will call it CTO.

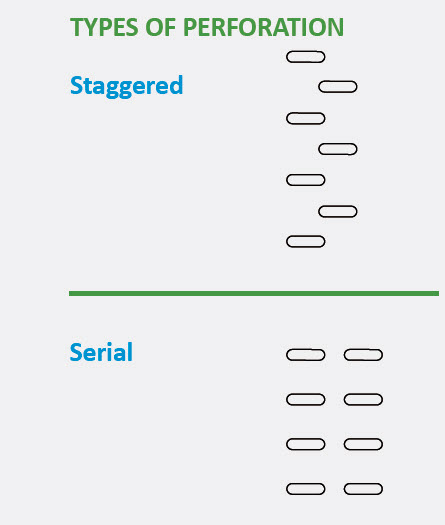
7- Type of perforation:
This is not an important topic, but you can find it in the manufacturer’s catalog.
Generally, we have two types of perforation, staggered type, and serial type.
(ii) Cable Trays Installations:
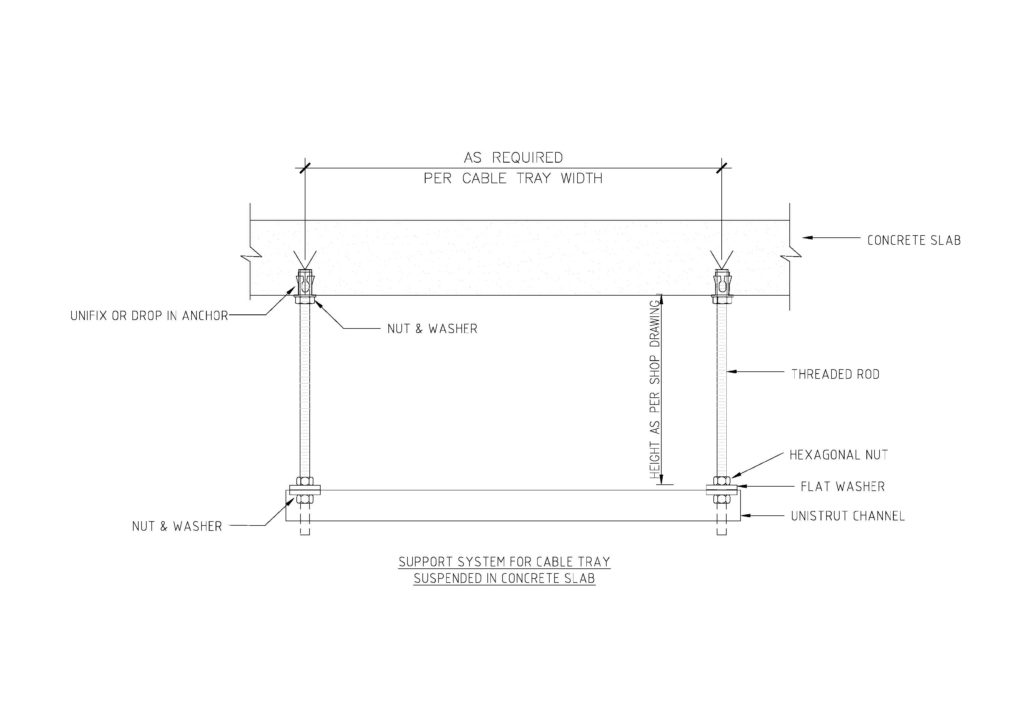
Firstly, to install these trays, you need a support system for them.
The support system will depend on the type of installation, whether it will be suspended in the concrete slab, or install on a wall or install them on a floor.
- For the installation type suspended in the concrete slab, we will need to use the following:
– Stud in anchor or unifix, we will install in the concrete slab to hole the threaded rods with complete support
– Threaded rods are galvanized rods that are threaded to be fit inside the unifix.
– Flat Washers
– Hexagonal Nuts
– C-Channel or slotted channel, usually it has two common sizes, either 41x41mm or 41x21mm
– Hexagonal rod coupler, it will be used in-case the length of the support is longer than the length of the threaded rod, so we will use this coupler to connect between both threaded rods.
Notes:
1- From the previous installation detailed drawing, we can see that for each support we will need to use (2 unifix+2 threaded rods+ 6 flat washers + 6 hexagonal nuts+1 piece of Unistrut C-channel).
2- The diameter of the threaded rods, unifix, flat washers, and nuts will depend on the weight of the tray with the cables installed inside these trays and the distance between every 2 supports.
Now I will talk about the most common fittings to be used with the perforated cable trays during the installations on-site:
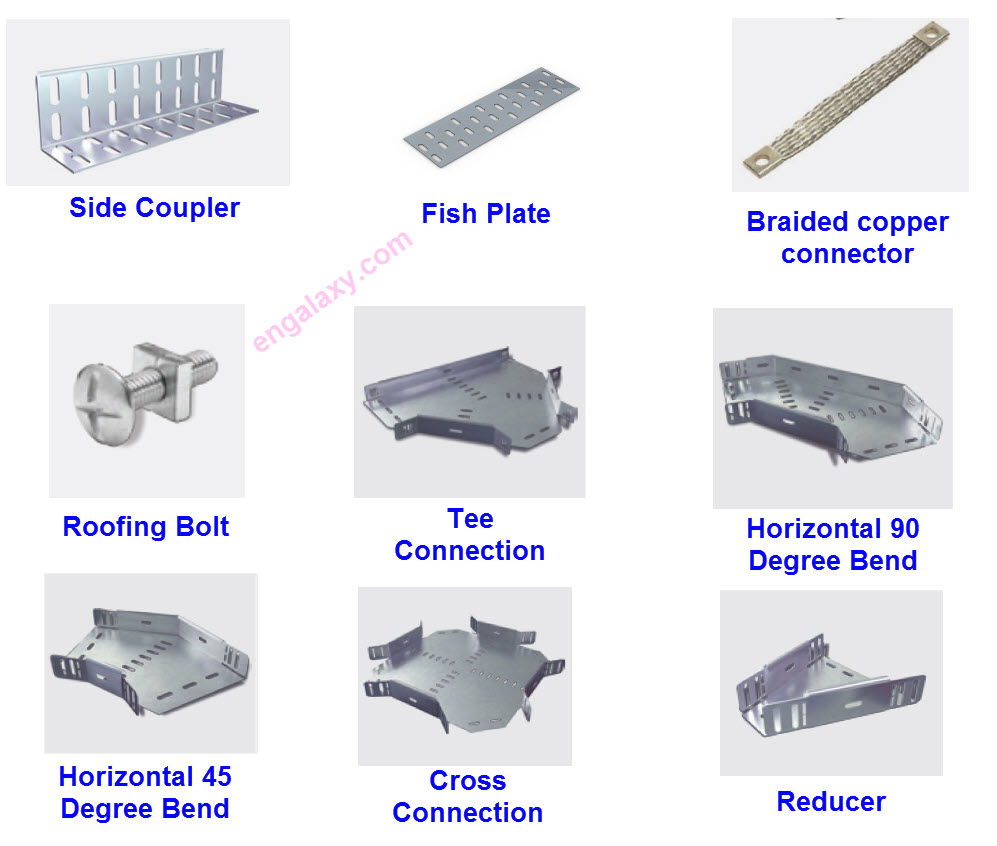
01- Side coupler
We are using it to connect between two pieces of the cable trays or connect between the tray and any other fitting.
02- Fishplate
It will be used with the perforated cable tray. We install it to connect two pieces of the perforated cable trays from their bottom inner sides.
03- Braided copper connector (Tinned Copper Flexible Braids)
It will be used as an earthing link to assure the full path of the cable tray route is already earthed.
04- Roofing bolts
We are using them to connect between the cable trays with the side couplers, or between the cable trays’ fittings and side couplers, and so on.
05- Tee Connections, either Equal or non-equal
We are using them in case we have 3 branches of the cable trays.
06- Horizontal 90-degree bend connection.
We are using it when the direction of the tray will be changed horizontally by 90 degrees.
07- Horizontal 45-degree bend connection
We are using it when the direction of the tray will be changed horizontally by 45 degrees.
08- Intersection or Cross Connection, either Equal or non-equal (4 Ways)
We use it when we have 4 branches of the cable trays.
09- Reducer
We are using it when the size of the tray will be changed to a smaller size, usually, this case will exist at the endpoint of the trays when we need to feed a final load like a disconnect switch or Isolator or Panel and so on.
10- Internal riser
We are using it when the cable tray routes go from a lower level to an upper level.
11- External riser.
We use it when the cable tray routes go from the upper level to a lower level.
12- Cover
You can understand from its name its purpose, we use it to cover the cable tray to protect the cables inside it.
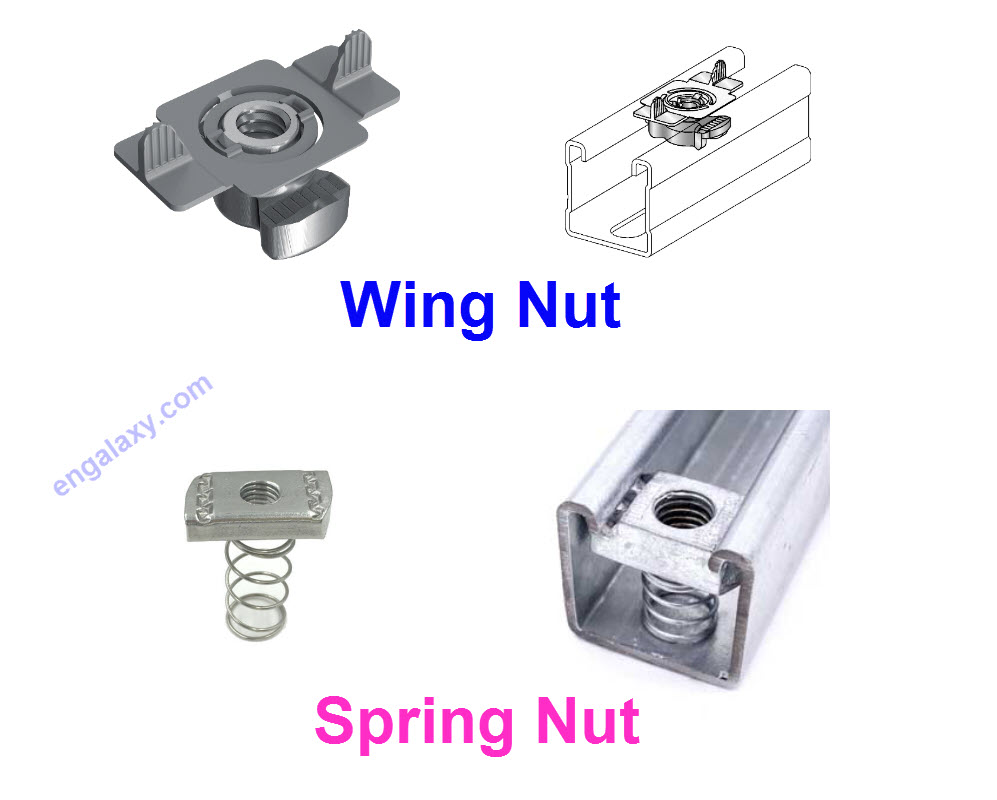
13- Spring nut
We use it to connect between the cable tray and unistrut channel.
14- Wingnut
It has the same function as the spring nut, but this type has wings on its sides.
Also, if you would like to read more about the different electrical tools with the electricians, please check this post from here.