Do you know what the heat shrink tubing is?
Did you see it before in the electrical panels?
Did you ask yourself how you could order the heat shrink tubing for your cables and conductors?
Have you ever asked yourself how you can install it On-site?
All the above questions and more to know about heat shrink tubing, you will find their answers in this article.
In the beginning, I want to remind you that any building for sure includes electrical outlets.
These outlets can be found in many types, like electrical normal power sockets, emergency sockets, lighting outlets, …etc.
And to give the power to all these outlets, you must have an electrical panel.
This electrical panel will be fed commonly by one of two methods, the first method is to use a busway (usually through tap-off), or you will use the power cables, which is the most common method in most of the projects.
These cables will be for sure multi-core to feed the different phases of the panel.
The multi-core cables we can find in one of the following forms:
A- Double cores or two cores cable, plus additional single core. The core means conductor, and each conductor will have its insulation, either PVC, or XLPE, or LSHF, …etc.
In this case, the cable’s manufacturers are combining the two cores combined in an outer sheath.
We are using this cable to feed the single-phase panels and loads, where the two cores we use to supply the phase and neutral, each one is separate, while the single-core we will use for earthing the panel.
B- Three cores cable, we will use this cable as the above scenario, but in this case, the manufacturers combine the three cores in one outer sheath.
C- Four Core Cable, we are using this cable to feed the three phases of panels and loads.
Three of the cable’s conductors we use to supply the three phases of the panel/load, while the fourth core/conductor we use to be neutral.
So if you cut a section of this cable, you will see four colors usually, these colors will be Red, Yellow, Blue, Black, or Brown, Black, Grey, Blue, or as per the standards of your country.
To provide an earth for the panel or the load, we provide an additional core or conductor.
Notes:
For the multi-core cables, we have two main types related to the cross-section area of the neutral. The first one is when the neutral cross-section area will be the same cross-section area as the phase conductors in the first type.

While in the other type, the cross-section area of the neutral will be almost half of the phase size, and in this case, we will call the cable multi-core cable with reduced neutral.
Now, I talk about how to connect the cable to the panel or the load.
As I said earlier, the cable consists of a conductor, and the conductive material of the cable can be Aluminum or Copper. In most cases, we will use copper conductors due to their high conductivity, which can reduce the cable’s final size and diameter.
The conductive material of the conductor can be either solid, or stranded, or flexible.
The conductor’s highest conductivity for the same cross-section area from high to low, flexible conductor then, stranded then, solid.
The reason for this high conductivity is due to the skin effect of current during passes through the conductor.
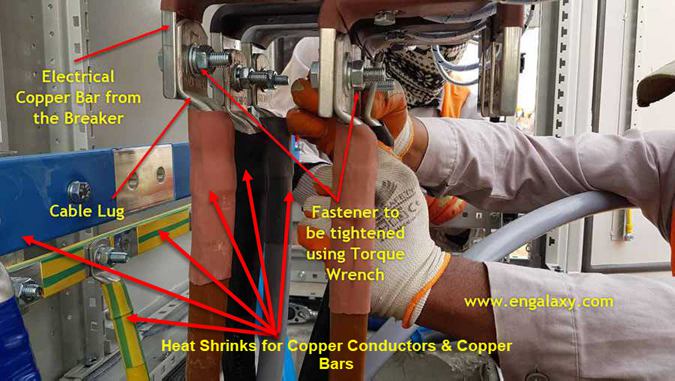
So, to connect this conductor copper (as this is the most common) to a copper bar or breaker, we shall use a method to give a direct contact and to avoid any loss of the connection, which can cause sparks, high currents, and later fires.
That’s why we shall use cable terminals; these cable terminals for the small cross-section area of cables usually will be pre-insulated, for example, for conductors 1.5mm2, 2mm2, 3mm2, 4mm2, and 6mm2.
But for the cables with bigger sizes, we will use cable lugs.
The purpose of these lugs is to insert the conductors inside these lugs and to have tight proper contact with the bar or the breaker.
The material of the cable lugs is conductive from both sides, its inner side and its outer side.
For the electrical installation, we need to cover the conductive materials with an insulating material, and now comes the importance of the heat shrink.
The heat shrink tubing is a tube from materials that can provide insulation for the conductive materials.
This tube is shrinkable that shrinks around the object (bar or lug, etc.) when we apply a source of heat to it.
In other words, the heat shrink tubing is a protective covering that protects the conductive parts from the surrounding environment.
We can also see the heat shrink tubing is installed on the copper bars of the panels, as you can see in this photo.
The heat shrinks have different colors, and we will choose their colors based on the color of the phase or the application.
To choose the proper size of the heat shrink tubing, we need to identify two main factors, the first one is the diameter of the heat shrink before it shrinks, we call this dimension (as supplied).
While the other factor is its dimension after it shrinks, and we call this dimension (after recovery).
To choose the correct heat shrink for its after recovery & as supplied dimensions, we shall know first the outer diameter of the cable or conductor or the bars, on which we will apply the heat shrink.
For example, if the conductor diameter is 18mm, we shall use a heat shrink that its dimension after recovery is less than 18mm, at the same time, it’s as supplied dimension to be bigger than 18mm, and we can control the diameter of the shrinking from the heat source which we apply on the heat shrink.
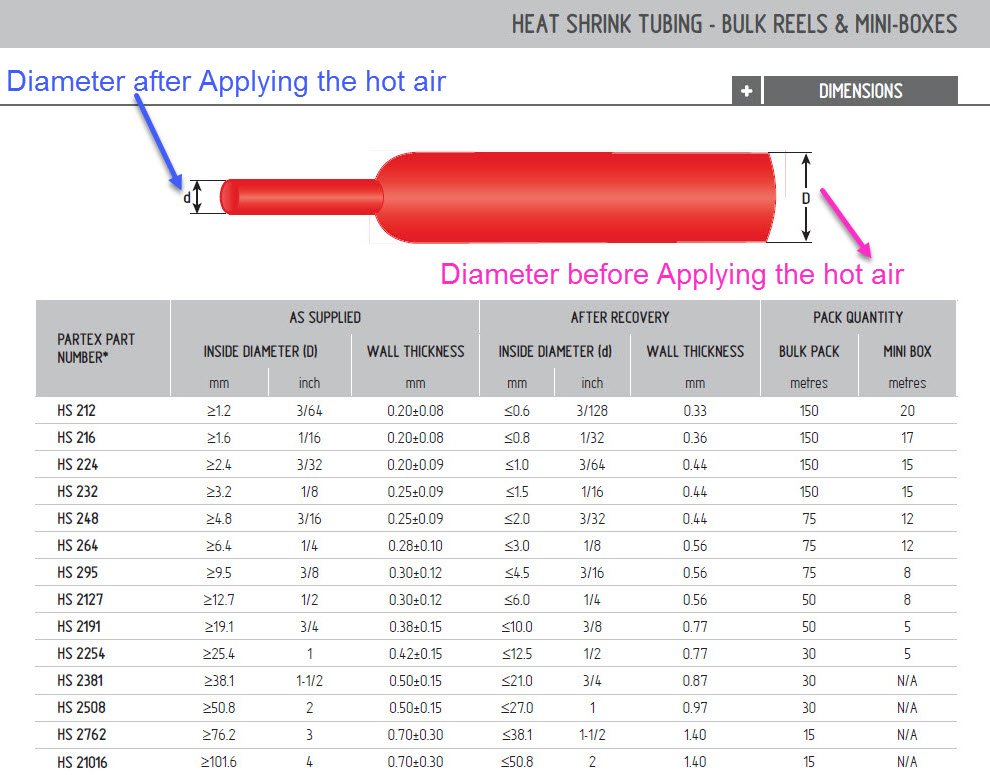
At the same time, we shall make sure the As-supplied dimensions of the heat shrink are bigger than the cable or conductor’s outer diameter.
Here’s a table that I prepared for the conductor size, cable size, and heat shrink size, plus the correct part number of the heat shrink.
This is a list of the tools which will be required to complete the job plus panel termination:
You can read also:
Emergency Lighting Fixtures – What you need to know in 5 minutes
Electrical Panel Schedule in Projects – 23 Important Notes you need to know
Knockout Hole Punch – How to use it in 5 easy steps
Torque Wrench – Your Best Guide in 4 Minutes
Electrical Panels – No.1 Guide in their Practical installations On-Site
Top 10 important tools with the electrician in Infrastructure Works
The Common 7 MEP Mistakes & Solutions in the Construction Projects- Your Best Guide
Your Easy BMS Guide “Building Management System” in Projects – No.1 Guide
Your Easy Guide in Understanding the Fire Alarm System from A to Z, 100% you will be satisfied
The Most Important 10 PPE in Construction Projects
Your No.1 Guide for better understanding MEP Infrastructure Networks in construction projects
No.1 Easy Guide about VRF & VRV Systems
If you like to learn the electrical practical installations on-site step by step in the help with practical photos and videos, please check the following link
If you want to watch how to perform this work practically on-site, please click on the following button.